Unlock the Secrets to Perfectly Mounting Your Monitor Like a Pro!
In today’s fast-paced digital world, having a well-mounted monitor is not just a luxury; it's a necessity for both productivity and ergonomics. A poorly placed monitor can lead to neck strain, eye fatigue, and decreased efficiency. However, many people face challenges when it comes to finding the right wall mount or correctly installing it. Understanding the benefits of proper wall mounting is crucial—enhanced screen visibility, more desk space, and a tidier workspace are just a few advantages. Whether you’re a gamer, a designer, or just someone trying to improve your home office setup, this guide will provide valuable information and tips on choosing and installing a wall mount for your monitor.
Choosing the Right Wall Mount
When it comes to wall mounts, there are several options available, each with its own set of pros and cons. The most common types include fixed mounts, tilting mounts, and full-motion mounts. Fixed mounts are the simplest and least expensive, providing a stable solution that keeps your monitor flush against the wall. However, they lack flexibility for adjusting the angle. Tilting mounts allow you to angle the monitor downwards, which is great for reducing glare, but they don't offer side-to-side motion. Full-motion mounts, on the other hand, are the most versatile, allowing you to adjust the height, tilt, and swivel your monitor in almost any direction. When selecting a wall mount, consider factors such as your monitor's size and weight capacity, which are crucial for ensuring stability. Additionally, check for VESA compatibility, as most mounts and monitors adhere to this standardized mounting interface. A friend of mine recently faced a dilemma when he bought a mount that wasn’t compatible with his monitor; it was a frustrating experience that could have been avoided with proper research. Taking these factors into account will help you make an informed choice that suits your needs.
Tools and Materials Needed for Installation
To successfully mount your monitor, you'll need a few essential tools and materials. Start with a drill, a level, and a screwdriver; these will help you secure the mount correctly and ensure everything is aligned properly. You’ll also need wall anchors and screws, which are vital for securing the mount to your wall. Before you begin, gather everything you need in advance to avoid interruptions. Having friends help can make this process easier and more fun. I remember when I helped a friend mount his monitor; we laid out all the tools beforehand, which made the installation go smoothly. Taking the time to prepare can save you from headaches later on!
Step-by-Step Installation Guide
Now that you have chosen the right wall mount and gathered your tools, it's time for installation. Here’s a step-by-step guide to help you through the process: 1. **Mark the Wall**: Begin by determining the ideal height for your monitor. Use a pencil to mark where the mount will go on the wall. 2. **Check for Studs**: Use a stud finder to locate the wall studs, as securing the mount to a stud will provide the most stability. 3. **Drill Holes**: Once you’ve marked the spots and located the studs, drill holes for your wall anchors if necessary. 4. **Attach the Mount**: Secure the wall mount to the wall using the screws and wall anchors. Make sure it’s level by using your level tool. 5. **Attach the Monitor**: With the mount securely in place, attach the monitor according to the manufacturer's instructions. 6. **Final Adjustments**: After the monitor is mounted, take a step back to ensure it’s at the correct height and angle. Adjust as necessary. This process may seem daunting, but with patience and careful measurements, you can achieve a professional-looking result. Remember, a slight miscalculation in measuring can lead to a crooked mount, so take your time!
Common Mistakes to Avoid
Even the most enthusiastic DIYers can make mistakes when mounting a monitor. Common errors include incorrect measurements, failing to use wall anchors, and not double-checking for stud placement. For instance, one of my friends rushed through the measurements and ended up with his monitor hanging too high on the wall, causing neck strain while using it. To avoid pitfalls like these, always measure twice before drilling any holes, and use wall anchors if you're mounting on drywall without studs. Taking the time to avoid these mistakes will save you from having to redo your installation later.
Adjusting and Optimizing Your Setup
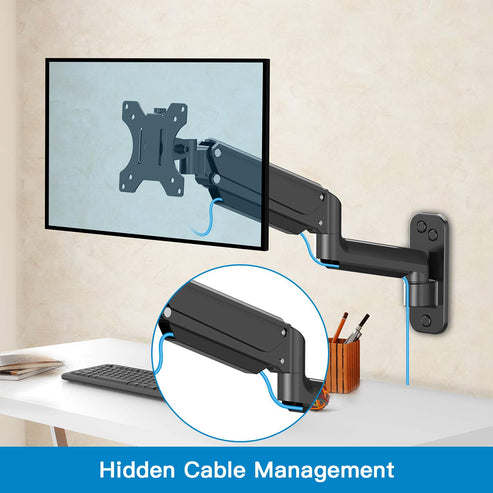
Once your monitor is securely mounted, it's essential to make adjustments for optimal viewing comfort. Start by adjusting the height and angle of your monitor to reduce glare and neck strain. Ideally, the top of the screen should be at eye level or slightly below when you're seated. Additionally, consider cable management to keep your workspace tidy. Use cable clips or sleeves to bundle cords together and minimize clutter. A clean setup not only looks better but also enhances productivity by making your workspace more inviting and organized. My workspace transformed drastically when I finally tackled the cable mess—it made a world of difference!
Enhancing Your Workspace with Proper Monitor Mounting
In summary, mounting your monitor can significantly improve your workspace and enhance your overall comfort. By choosing the right wall mount, gathering the necessary tools, following a clear installation guide, and avoiding common mistakes, you can achieve a professional-looking setup. The benefits of a well-mounted monitor extend beyond aesthetics; they include improved ergonomics and a more efficient workspace. So take the plunge, follow the steps outlined, and enjoy the transformation of your workspace into an organized and ergonomic environment!